How to easily update your old house and keep it’s charm

Texas Real Estate Agents, Austin Realtors, Central Texas Real Estate, Texas Real Estate Companies, Austin Real Estate Companies, Texas Real Estate Broker

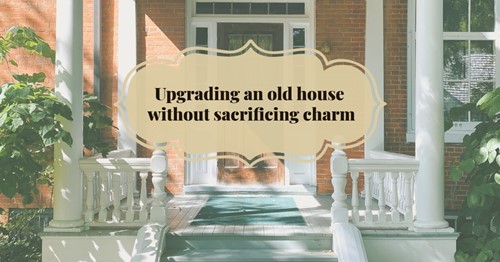
Old houses have an allure to them that many newer models may be missing, unless specifically built to model an older home. Whether it’s the nostalgia from your family home, you’re a history buff with a dream of living in a historic district or you’re simply one of many old house enthusiasts, old homes have a pull that seldom goes unnoticed.

And let’s say you get you find your dream home, make an offer, and actually get to live in the house you’ve always wanted. Are there any other steps to living on the property where the home sits? What about old house restoration? What about room expansion? What about smaller projects that could benefit both your life and your home site?

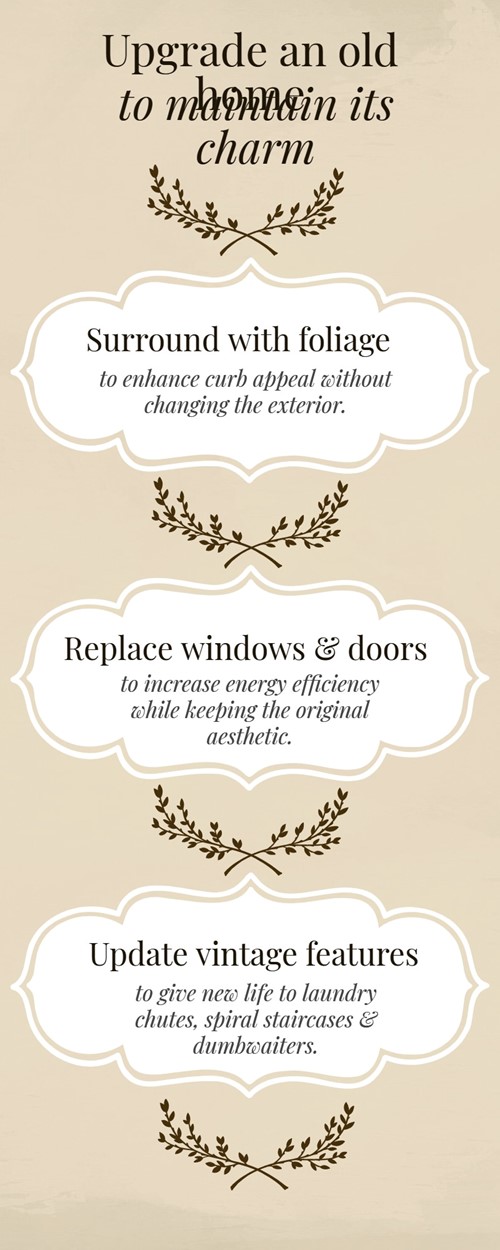
Here are three smaller projects that can be done around an old house and older property to enrich your lifestyle and maintain your old house’s allure.

Add foliage

A benefit of having an old home is its aesthetic. However, that aesthetic can be threatened by things such as decrepit trees, blank places where flora once stood or any or the hundreds of thousands of combinations associated with decreased curb appeal. But fret not. There’s a fairly simple solution: add more foliage.

Trees such as evergreens, oaks (depending on your location) and willows can bring an added level of allure to your home. These trees are also fairly easy to care for, and bring an enticing nostalgia to the property.

Swap out your windows & doors

Old houses, while boasting excellent and often Herculean structures, tend to have one correlating flaw across the board: energy efficiency leaks. These leaks are often due to warped doors or windows still hanging in their original framework.

For doors, try adding an energy-efficient style – like fiberglass or vinyl. When hanging new windows, opt for double panes, since they can save anywhere from 18% to 24% on your utilities.

Update old house features

Old houses often come with old features, like dumbwaiters, narrow staircases or now-decorative fireplaces. While some of these items may hold a host of charm, some can be updated, cleaned or put back into use after a thorough inspection.

Electrical systems and plumbing should be taken care of first, especially if there’s an issue as noted by a professional. However, updating insulation behind walls, adding a more energy-efficient wall surface or even repurposing old laundry chutes can not only capitalize on your home’s character, but help you save a little extra in the long run.

Whether you’re purchasing an older house to flip or live in for years to come, updating some of the older features can maintain the appeal of the home without causing you headaches down the road.

Pros and cons of installing a steel door

Texas Real Estate Agents, Austin Realtors, Central Texas Real Estate, Texas Real Estate Companies, Austin Real Estate Companies, Texas Real Estate Broker

The primary entrance to any house deserves an attractive aesthetic with reliable security. Property owners often select thick, hardwood materials because they provide curbside appeal and durable strength. Steel doors remain something of an afterthought because they are more closely associated with commercial buildings, which may not appear to have the same design prowess.

But the advanced technologies and design elements integrated into today’s steel doors place them on an equal footing with others in their class. Today’s steel doors provide a wide range of proven benefits as well as concerns. If you are considering replacing an existing exterior door, these are things to consider about steel options.

Energy efficient

Steel doors rank among the most energy-efficient compared to leading materials such as wood or fiberglass. Steel doors can effectively prevent air leaks, and quality products generally include secure foam insulation.

Structurally sound

Except for extreme heat, steel doors are generally not affected by weather conditions. Wood tends to fluctuate as seasonal temperatures rise and fall, and they can warp when wet. Steel, by contrast, remains an immovable object.

Sturdy

Steel ranks among the most secure materials when deterring break-ins. Many products are integrated into a metal frame and robust locking systems. Wood and fiberglass doors, while typically secure, may not be as secure as a stainless steel door.

Finishes

Contemporary steel doors can be ordered with a wide variety of finishes, mimicking natural wood and other textures. Consumers can also select from wide-reaching color options or pre-primed products, leaving the final color up to DIY homeowners to decide after installation.

Damage

Although steel doors resist showing ordinary wear and tear, hard impacts can leave dents and scratches. Unlike wood doors, property owners cannot easily fix these imperfections with putty and paint.

Rust

The flipside of wood doors warping or peeling is steel doors can show rust after scratched protective coatings come in contact with rain and moisture. This possibility tasks people with sometimes sanding and repainting scratched steel doors.

Installation

A handy DIYer typically possesses the tools and carpentry skills to install wood and fiberglass products, largely because they come with wood casings that only require leveling and screwing into 2×4 framing lumber. Steel doors generally employ metal casings that often require advanced skills to install.

By conducting a little research and considering the pros and cons of different materials, you can make an informed decision about the best door for your home.

Conserve water with these gardening ideas

Texas Real Estate Agents, Austin Realtors, Central Texas Real Estate, Texas Real Estate Companies, Austin Real Estate Companies, Texas Real Estate Broker

If you’re trying to find eco-friendly gardening ideas. to sprucing up your Texas Home for, the best place to start is with water conservation. Recycling and reducing your water use in the garden is simpler than you might think, too. Here are some ideas for DIY garden projects to help you save water:

Go with ground covers

Grass lawns are a major source of water waste and require a ton of maintenance. Instead of a grass lawn, consider using ground-cover plants for any exposed areas of your garden. Stonecrop is one of the best options for low-water usage ground cover, since it’s a succulent with a natural spreading growth pattern.

Build a dry stream

A dry stream built out of smooth river rocks makes a beautiful statement in any garden. For a fun DIY garden project, dig a shallow channel to naturally divert excess moisture to the plants that need it most. The rocks will form a natural filtration system and create a charming desert oasis aesthetic.

Opt for drought-tolerant plants

You can still have garden beds full of diverse and colorful plants while still saving water. The key is to choose drought-tolerant plants that can go longer periods of time without being watered.

Some beautiful ideas for raised garden beds are shrubs like butterfly bush, red bird of paradise and bougainvillea. Prefer succulents and cacti? Create a garden bed or vertical garden full of colorful succulents in a plethora of colors, shapes and growth patterns.

Try a rock garden

Rock gardens are another beautiful way to decorate an outdoor living space without adding extra need for water. Rock garden designs range from sparse to elaborate, and can be both artistic and natural in appearance. Create an area of the garden with different sizes and types of stone planted with drought-tolerant ground cover crops for an eco-friendly DIY garden project.

Collect with rain barrels

If you live somewhere with frequent rainfall, it might seem like saving water isn’t as important. However, using rain barrels to collect extra rainwater for later use is a more sustainable practice than turning on the hose every time, which costs you money. You can create budget friendly DIY rain barrels out of basic materials, or check out the offerings from your local garden center.

By using any of these garden projects to conserve water, you’ll experience the benefits of a lower water bill and the peace of mind knowing you’ve reduced the amount of wasted water – and time spent on labor – in your garden.

Environmental Art Explained

Texas Real Estate Agents, Austin Realtors, Central Texas Real Estate, Texas Real Estate Companies, Austin Real Estate Companies, Texas Real Estate Broker

Environmental art became popular in the late 20th century because of growing concern and awareness for the environment. Environmental art has several overlapping characteristics as land art or earthworks, but comments or establishes an opinion on environmental issues. As artists continue to think about the environment as a cohesive system rather than a living space, the appeal and spread of environmental art continues. Here are the basic elements of environmental art to help gain a better understanding of the term.

Exploring Humans’ Relationship With Nature

Environmental artists try to establish their relationship with the natural world in several ways. One way is through bringing their creative workspaces out of the studio and into the environment. This challenges the static concept of a specific place for creating art and instead allows a more integrated relationship with a variety of settings.

Maintaining Harmony With the Environment

Environmental art is all about working with nature instead of against it. Artists who create environmental art take special care in their processes and material usage in order to minimize damage to the surroundings. The health and wellbeing of the environment takes precedence over the artistic process, which also means environmental art is vulnerable to the same changes (such as erosion, flooding and decay).

Using Natural Materials

Besides natural settings, environmental artists use natural materials in creating art. Common examples include sticks and branches, stone, gravel, sand, flowers and leaves. The goal of environmental art is to encourage the viewer to look at the natural environment differently through art. Ultimately, the idea is to create a greater awareness of small but important details of the natural world and our effect on them.

Rethinking Exhibition Space

Taking its cue from land art, environmental art exists outside of the commercialized art world. While you may find environmental art in urban areas, you won’t find it in a museum or art gallery. This creates an enhanced accessibility for viewers and allows them to participate in art even if they have never considered or been able to visit an established institution before. A lot of environmental art means to send a message as activism and this denial of the more traditional art world factors into that by giving ownership of the art to nature rather than gallery owners and other organizations.

As science advances and environmental awareness grows, so does the power and popularity of environmental art. Artists who want to send a message about the importance of humanity’s relationship with the natural world can do so in a variety of ways through art. While environmental art exists in many facets and forms, these key elements are the most important in understanding the term.

Create a Rustic Walkway with Native Stones

Texas Real Estate Agents, Austin Realtors, Central Texas Real Estate, Texas Real Estate Companies, Austin Real Estate Companies, Texas Real Estate Broker

Image by Nancy Buron from Pixabay

If you’re like many homeowners who prefer a natural landscape plan, your outdoor living space undoubtedly features lush vegetation and bright, blooming flowers. However, you might also have the sense that something is missing but can’t quite put your finger on what it might be. If this describes you, the missing element is probably hardscaping. Hardscaping refers to elements of landscaping that aren’t plants, such as water features, statuary, gazebos and garden paths.

At its best, hardscaping brings functionality to the table as well as enhances aesthetics. Few things do this better than a rustic stone walkway meandering over the property. Here’s how to make it happen yourself over the course of an average weekend.

Select Your Stones

Stones used for walkways should be flat, wide and thick enough to withstand foot traffic. Choosing stone that is found naturally in your area cuts down on retail and delivery costs. Avoid using polished stones because these present potential slip-and-fall issues due to their slick surfaces. Stones that are between two and three inches thick offer better stability than their thinner counterparts and often come with a more attractive price tag as well.

Lay Out Your Walkway

The first step is to determine your walkway. Avoid straight lines — stone walkaways are meant to meander. Garden hoses are ideal for marking garden paths that curve. Use a sod cutter and a flat spade to cut and remove the grass, and dig out the soil where you want to place the stones to about a depth of five inches and make sure it’s firmly tamped down before placing landscape fabric and adding a two-inch layer of sand over it.

After smoothing down the sand so it provides a flat surface, it’s time to lay down the stones. This part is a little like putting together a jigsaw puzzle, so take your time to figure out the placement. Be sure to use a carpenter’s level to make certain that the stones are at the same height, and add or remove sand as needed. However, if you live in an area that receives significant amounts of precipitation, slightly sloping the larger stones toward the outside of your walkaway helps prevent standing water issues.

Landscape the Walkway

Some people prefer the clean, austere aesthetic of pebble or oyster shell mulch in the gaps between the stones, while others like the rustic, tousled look provided by low-growing herbaceous plants. Corsican mint is an excellent choice because it has a bright green color all year round and releases a divine, minty aroma. Other choices include creeping thyme, rock cress, artemisia and sedum. You can also mix it up with a variety of ground covers for a classic, cottage garden look.

Home Building Pros and Cons

Texas Real Estate Agents, Austin Realtors, Central Texas Real Estate, Texas Real Estate Companies, Austin Real Estate Companies, Texas Real Estate Broker

How do you know if it’s better to buy or to build? There are many factors to take into consideration when trying to decide which direction to take. The most popular reasons to build a house are the freedom of customization and the lower ongoing maintenance costs, but these benefits can also have drawbacks. Buying a home is almost always quicker and more convenient and sometimes less expensive. So how do you choose? To help you decide which is best for you, we’ll go over these key benefits and disadvantages.

Building Pro: Customization and Control

When you build a home, you literally begin with a blank canvas. You can make all the decisions and get exactly what you want. You can decide on the size, location, number of bedrooms and bathrooms, layout and architectural style of the home. You can also opt for specific features that might be hard to find in pre-existing homes in your area, like bay windows or a daylight basement. Everything down to the drawer-pulls and counter tops is up to you. While this can be incredibly overwhelming for some, others thrive with complete creative freedom.

Building a home also gives you control over every part of the process. You have your choice of architects, builders, real estate agents and other professionals to help you build your dream home. Building a home allows you to be involved in every stage and decision and make changes or requests at the right time. While the builder will serve as the official project manager for the build, you still get a front-row seat and can give input anytime.

Building Con: It’s a Long Process

Downside to customization and control of the process is that the process is long. Even if you go for a more hands-off approach to your home build, you’re still starting literally from the ground up. There are contracts and permits and financial processes to complete before you break ground. Once the work actually begins you will need to wait at least several months before your home is move-in ready. Delays can and often happen, whether they be due to weather, materials or labor issues. Even outside of the construction, the freedom to make all the decisions also means taking the time to make those decisions carefully. Careful planning is essential if you choose to build a home, as is flexibility and patience.

Building Pro: New = Less Maintenance

From the concrete in the foundation to the countertops in the kitchen, every piece of the home you build will be brand new. The latest and greatest materials, construction methods and system design all combine to give you peace of mind regarding maintenance. It’s common for homeowners to save thousands of dollars in maintenance costs in the first several years and beyond. Major components like roofing and HVAC systems will remain in great condition for a decade or more. Brand-new appliances and features like windows or countertops often come with warranties that last years as well. Most builders also provide their own warranties or even insurance to cover the possibility of problems or defects with the structure of the house. Overall, building a new home means you don’t have to worry about things like outdated plumbing or cracking foundations, saving you money and stress.

Building Con: New = More Expensive

Building a new house is frequently more expensive than buying an existing home. All the reasons above can factor into this cost: builder fees, custom material choices, brand-new appliances and more. The larger and more custom your home design is, the higher the price, especially if you request specific non-standard components and materials. Labor also accounts for a significant amount of the cost, as your builder will hire out an entire team of individuals to do the best work possible. Getting a construction loan will help you finance the project, but most require large down payments that will cost you more up front. You being involved in every part of the process also means your money being involved in every part of the process and that includes any unexpected expenses that may arise.

There are exceptions to all the above. Not every home building project takes an extremely long time and not all pre-existing homes are immediately move-in ready. There are plenty of ways to save money on a custom home build just as there are plenty of ways to pay unexpectedly large amounts for an existing home. Creating a detailed breakdown of your wants and needs and building a well-informed budget will help you decide which option is best for you.

What you need to know about non load bearing walls

Texas Real Estate Agents, Austin Realtors, Central Texas Real Estate, Texas Real Estate Companies, Austin Real Estate Companies, Texas Real Estate Broker

If you’re planning a major remodel of your home, you’ll need to know about safely removing non load bearing walls. Most interior walls you are likely to remove during a remodeling project are non load bearing, but it’s important to know how to identify them before you begin demolition.

As always with significant renovation projects, consult a professional before you get into your home renovation.

Here is a basic guide to non load bearing walls:

What are examples of non load bearing walls?

Walls in your home exist for many reasons other than bearing loads. Here are some examples of non load bearing walls you’re likely to have in your house:

  • Closet walls.
  • Interior basement walls.
  • Walls between bedrooms.
  • Angular walls covering corners.

What is the best way to remove a non load bearing wall?

While demolishing a wall might make you think of sledgehammers, it’s much safer and more effective to remove non load bearing walls piece by piece. The basic strategy for safely removing a non load bearing wall is to begin with the outside layers and work inward.

It may seem simple, but it’s essential to hire professional help for removing walls of any kind. Even if the wall is not load bearing, you will need to install headers to support the weight from above. Removing a wall also requires altering electrical circuits, plumbing or gas pipes and HVAC ductwork in a safe and precise manner. Pipes and wires will either need to be capped off or redirected.

For safety reasons, it’s recommended that you consult an engineer or other construction professional for help removing a non load bearing wall. They can make sure all changes adhere to building codes and will keep you and your home safe in the future.

Keep this in mind when planning a major remodel of your home, and plan accordingly, so you have the support you need.

Host a Yard Sale Before You List Your House

Texas Real Estate Agents, Austin Realtors, Central Texas Real Estate, Texas Real Estate Companies, Austin Real Estate Companies, Texas Real Estate Broker

If you intend to sell your home, you may want to host a yard sale. Thanks to a yard sale, you can eliminate clutter from your residence. Furthermore, a yard sale enables you to connect with your local community and inform community members about your plans to list your house.

Ultimately, there are many ways to ensure a yard sale is an instant success. These include:

1. Determine Exactly What You Want to Sell

You know you have a lot of items you want to remove from your house before you add it to the real estate market. As such, you should allocate time and resources to determine which items to keep and which items to sell.

If you have a variety of items you intend to keep, you may want to rent a storage unit. With a storage unit, you can keep your personal belongings safe until your residence sells.

Meanwhile, with items you want to sell at your yard sale, ensure they work properly and look great. You also may want to perform research to determine a fair price for these items based on their age and condition.

2. Pick a Good Date for Your Yard Sale

A Saturday or Sunday morning is the perfect time to kick off a yard sale. Select a date and time for your yard sale, and you can start counting the days until this event takes place.

Of course, as you consider yard sale dates, be sure to avoid scheduling your yard sale on a holiday. And remember, if you start your yard sale early in the day, you can give visitors plenty of time to check out your event.

3. Promote Your Yard Sale Properly

Create yard sale posters and set them up around your community. That way, you can promote your yard sale to a large group of community members in the days leading up to your event.

In addition, you may want to promote your yard sale online. Social networks make it easy to share information about your yard sale and may help you reach many people beyond your city or town.

As you get set to sell your home and host an upcoming yard sale, you may want to reach out to a real estate agent too. A real estate agent can help you get ready for the house selling journey and ensure you can achieve the optimal results.

A real estate agent is a home selling expert who is committed to client satisfaction. He or she will help you promote your residence to prospective buyers, analyze offers to purchase your home and much more. Plus, if you have any concerns as you navigate the home selling process, a real estate agent can respond to them.

Want to sell your home in the near future? Host a yard sale, and you can move one step closer to eliminating clutter from your home and adding your residence to the housing market.

3 Benefits of Hiring a Home Staging Professional

Texas Real Estate Agents, Austin Realtors, Central Texas Real Estate, Texas Real Estate Companies, Austin Real Estate Companies, Texas Real Estate Broker

While there are many parts of staging you can do yourself, there are some important benefits to hiring a professional. A professional home stager can help you prepare your home for the market and can use their expertise to sell your home quicker and for a higher price.

Here are the three biggest reasons to hire a staging professional to help you sell your home:

Networking Power

If you’re working with a real estate agent to sell your home it’s likely they recommended you hire a staging professional to help. They might even have a specific individual or firm to suggest. Just by making that initial connection, you’re already benefiting from the powerful networking abilities that home staging professionals have. Home stagers “know all the right people” in the industry in order to do their jobs well. What does this mean for you? With access to a network of other professionals, stagers can help you get the best price for any materials or services needed to update your home. Painters, contractors or even furniture rental services are all examples of important contacts who can save you money. You also get the peace of mind that your staging professional has existing relationships with these other individuals or companies and knows what to expect in terms of service and costs.

An Objective Viewpoint

A home staging professional will provide you with valuable perspective. Having never lived in it, a stager won’t have the same emotional connection to your home. Even besides emotional attachment, they will see things you might miss as a homeowner simply because you see them every day. A staging professional will have a fresh and purely objective viewpoint on your home which will allow them to do their job to the best of their ability. They will identify potential issues, make suggestions or changes to prepare your home for potential buyers. The more experience they have in staging homes, the better: staging professionals are up-to-date on home trends and will cater to the current market with their knowledge.

Bringing Out the Best in Your Home

Staging professionals will see your home objectively but also strategically. When staging a home, it’s impossible to make everything absolutely perfect for every potential buyer. That’s why it’s important to find the best features of your home to highlight. Stagers can see the potential value in every aspect of your property and will know where best to apply your money and hard work. They might identify if you have under-used space and if you could rearrange your furniture to make your rooms seem bigger. They can replace or add new window treatments in order to emphasize a home’s natural light. A staging professional will identify and highlight what’s best about your home so that potential buyers will recognize and desire those features as well.

There are lots of details that go into staging your home for sale but the key benefit of hiring a professional stager is that they bring a fresh perspective. For example, what you might consider the best feature in your home might not be what buyers are looking for. You might need improvements in places you don’t notice because you see them every day. If you want the best possible price for your home, definitely consider hiring a staging professional to help.

Craft Your Own Miniature Plant Stand With This DIY Guide

Texas Real Estate Agents, Austin Realtors, Central Texas Real Estate, Texas Real Estate Companies, Austin Real Estate Companies, Texas Real Estate Broker

Adding height variation to your plant collection can enhance the entire look of the collection. Even if you have your potted plants on a shelf, table or other surface off of the floor, some plants definitely benefit from sitting up higher. There are plenty of tabletop plant stands available on the market but they’re also easy to build yourself. Here are the materials and steps needed to make your very own miniature plant stands.

Materials & Tools

Square wood dowel
Dowel pins
Wood glue
Wood stain
Sealer
Rag
Plant pot
Measuring tape
Hand saw
Drill & drill bit
Sandpaper or power sander
Clamps

Process

  1. The very first thing you need to do is measure the diameter of the pot you want to use in the stand. If it’s a tapered or round shape, measure both the bottom and the widest point (whether at the top or in the middle).
  2. Measure and cut the wood dowel so that you have 4 “legs.” For the crosspieces, you’ll need one long piece and two smaller pieces to make the cross.
  3. Mark where the drill holes will go. Add drill holes to the center and either end of the crosspieces and into the middle of each side support. Make the holes approximately 1/2 inch deep.
  4. Use glue and dowels to connect the crosspieces. Add a bit of glue to the end of the dowel and fit it into each hole, clamping the pieces together to make sure it’s a firm fit. Once connected, you should have an X shape.
  5. Now add dowels into each end of the cross and secure them with glue. Attach the leg pieces by fitting the dowels into the holes you drilled in the center of each support. Use the clamp to hold everything steady while gluing.
  6. Make sure the glue is dry and check for any sign of wobbling. If you have some slight unevenness in the legs you can sand down the longest one or more to even them out. If there is a dramatic difference, you may need a hand or hack saw to correct it.
  7. Sand all the surfaces thoroughly to prepare for the stain or paint you want to use. Scrape off any extra dried glue you find, since it won’t take the stain or paint.
  8. Once you’re finished sanding and prepping, paint the visible surfaces and add a coat of seal afterward.
  9. Grab your plant pot and test out the stand. Check again for any signs of unevenness or wobbling and adjust accordingly. Experiment to find the best looking spot for your new tabletop plant stand to complement the plant itself as well as offer it the maximum light and air flow.